
For Programmer
13.댓글 기능 생성(3) SingleComment.js 만들기 - 유튜브 클론 코딩 본문
React & Node.js 프로젝트/유튜브 클론 코딩
13.댓글 기능 생성(3) SingleComment.js 만들기 - 유튜브 클론 코딩
유지광이 2020. 7. 26. 23:23728x90

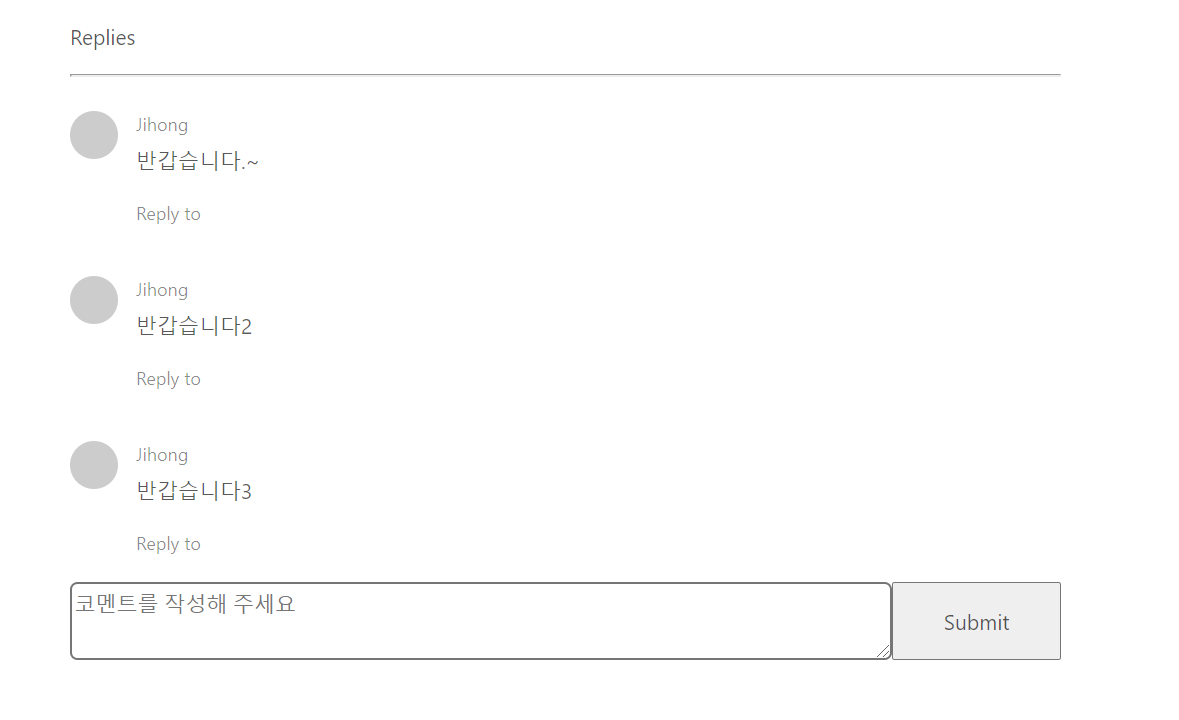
1. Comment.js에 SingleComment Component생성
{/* Comment Lists */}
      {props.commentList &&
        props.commentList.map(
          (comment, index) =>
            !comment.responseTo && (
              <SingleComment
                refreshFunction={props.refreshFunction}
                comment={comment}
                postId={props.postId}
                key={index}
              />
            )
        )}
* props.commentList && 는 comment가 존재할떄만 있을 경우에만 comment들을 보여주겠다는 의미이고 !comment.responseTo 의 의미는 responseTo는 답글을 달았으때만 몽고DB에 저장되는 값이기 때문에 이것이 없는 댓글들 즉, 대댓글이 아닌 댓글들만 페이지를 로딩했을때 우선적으로 보여주겠다는 의미이다. Comment.js의 부모컴포넌트인 VideoDetailPage.js에서는 다음과같은 것들을 props로 주고있다.
					{/* comment*/}
<Comment postId={videoId} commentList={Comments} refreshFunction={refreshFunction} />
2.Single Comment의 코드 작성(Axios통신 포함),(client-src-components-views-VideoDetailPage-Sections-SingleComment.js)
import React, { useState } from 'react';
import { Comment, Avatar, Button, Input } from 'antd';
import { useSelector } from 'react-redux';
import Axios from 'axios';

const { TextArea } = Input;

function SingleComment(props) {
  const [OpenReply, setOpenReply] = useState(false);
  const [CommentValue, setCommentValue] = useState('');

  const user = useSelector((state) => state.user);

  const onsubmit = (event) => {
    event.preventDefault();
    const variables = {
      content: CommentValue,
      writer: user.userData._id,
      postId: props.postId,
      responseTo: props.comment._id,
    };
    Axios.post('/api/comment/saveComment', variables).then((response) => {
      if (response.data.success) {
        console.log(response.data.result);
        setCommentValue(''); //저장후 빈칸으로 만들기 위해
        props.refreshFunction(response.data.result);
      } else {
        alert('커멘트를 저장하지 못했습니다.');
      }
    });
  };
  const onClickReplyOpen = () => {
    setOpenReply(!OpenReply);
  };
  const onHandleChange = (event) => {
    setCommentValue(event.currentTarget.value);
  };
  const actions = [
    <span onClick={onClickReplyOpen} key="comment-basic-reply-to">
      Reply to
    </span>,
  ];
  return (
    <div>
      <Comment
        actions={actions}
        author={props.comment.writer.name}
        avatar={<Avatar src={props.comment.writer.image} alt />}
        content={<p>{props.comment.content}</p>}
      />
      {OpenReply && ( //openReply값이 true일때만 대댓글창을 보이게만듬
        <form style={{ display: 'flex' }} onSubmit={onsubmit}>
          <textarea
            style={{ width: '100%', borderRadius: '5px' }}
            onChange={onHandleChange}
            value={CommentValue}
            placeholder="코멘트를 작성해 주세요"
          />
          <br />
          <button style={{ width: '20%', height: '52px' }} onClick={onsubmit}>
            Submit
          </button>
        </form>
      )}
    </div>
  );
}

export default SingleComment;
3.VideoDetailPage.js에서 몽고DB에 저장되어있는 글을 가져오기 위한 Axios통신 코드 작성
function VideoDetailPage(props) {
  const videoId = props.match.params.videoId;
  //랜딩페이지에서 주소창뒤에 videoId를 보내주고있기때문에가능
  const variable = { videoId: videoId };
  const [VideoDetail, setVideoDetail] = useState([]);
  const [Comments, setComments] = useState([]);

  useEffect(() => {
    Axios.post('/api/video/getVideoDetail', variable).then((response) => {
      if (response.data.success) {
        console.log(response.data);
        setVideoDetail(response.data.videoDetail);
      } else {
        alert('비디오 정보를 가져오길 실패했습니다.');
      }
    });

    Axios.post('/api/comment/getComments', variable).then((response) => {
      if (response.data.success) {
        console.log(response.data.comments);
        setComments(response.data.comments);
      } else {
        alert('코멘트 정보를 가져오는 것을 실패 하였습니다.');
      }
    });
  }, []);
  const refreshFunction = (newComment) => {
    //부모의 Comments state값을 업데이트하기위한 함수
    setComments(Comments.concat(newComment)); //자식들한테 값을 전달받아 Comments값 업데이트
  };
  if (VideoDetail.writer) {
    const subscribeButton = VideoDetail
    ....이하생략
*getComments api를 만들어 몽고DB에 저장되어있는 댓글들을 가져온다.
4.서버에서 해당 데이터요청을 받아서 제공해주는 API 코드작성
router.post("/getComments", (req, res) => {
  Comment.find({ postId: req.body.videoId })
    .populate("writer")
    .exec((err, comments) => {
      if (err) return res.status(400).send(err);
      res.status(200).json({ success: true, comments });
    });
});
5. 저장된 댓글을 Parent Componet(VideoDetailPage.js)에다가 업데이트
* 5번작업은
const refreshFunction = (newComment) => {
    //부모의 Comments state값을 업데이트하기위한 함수
    setComments(Comments.concat(newComment)); //자식들한테 값을 전달받아 Comments값 업데이트
  };
VideoDetailPage.js 에 해당 함수를 만들면서 가능하다. 그리고 이 함수를 자식컴포넌트에 props값으로 넘겨주는데 다음과 같은 일을 해주는 이유는 자식컴포넌트에서(SingleComment.js,Comment.js) 댓글작성이나 답글작성을 다하는데 자식컴포넌트에서 댓글작성을한다고 해서 부모 컴포넌트의 state값이 바뀌는 것이아니다. 따라서 새로고침을 하여 페이지를 다시 불러올때까지 새로운 댓글을 작성한것을 불러오지를 못하는데 이를 방지하기위해서 자식컴포넌트에서 작성한 댓글을 바로 부모의 state에 넣음으로써 페이지를 새로고침하지않아도 바로 리렌더링될때 방금작성한 댓글이 페이지에 보이게 할 수 있는것이다.
*SingleComment.js추가코드
Axios.post('/api/comment/saveComment', variables).then((response) => {
      if (response.data.success) {
        setCommentValue(''); //저장후 빈칸으로 만들기 위해
        props.refreshFunction(response.data.result);
        setOpenReply(false); //엔터 입력후 댓글창 자동으로 닫는기능
      } else {
        alert('커멘트를 저장하지 못했습니다.');
      }
    });
    ...이하생략
*Comment.js추가코드
 Axios.post('/api/comment/saveComment', variables).then((response) => {
      if (response.data.success) {
        setcommentValue('');
        props.refreshFunction(response.data.result);
      } else {
        alert('커멘트를 저장하지 못했습니다.');
      }
    }); ...이하생략
해당강의
728x90
'React & Node.js 프로젝트 > 유튜브 클론 코딩' 카테고리의 다른 글
| 15. 좋아요 싫어요 기능(1) 구조설명 - 유튜브 클론 코딩 (0) | 2020.07.27 |
|---|---|
| 14.댓글기능생성(4) ReplyComment.js 만들기 - - 유튜브 클론 코딩 (0) | 2020.07.27 |
| 12. 댓글 기능 생성(2) Comment.js 라우터 생성 - 유튜브 클론 코딩 (0) | 2020.07.26 |
| 11. 댓글 기능 생성(1) 구조 설명 - 유튜브 클론 코딩 (0) | 2020.07.26 |
| 10. 자신이 구독한 계정들의 비디오만 나오는 페이지 구현 - 유튜브 클론 코딩 (1) | 2020.07.23 |
'React & Node.js 프로젝트/유튜브 클론 코딩' Related Articles
more


Comments